Building a powerful Batman detector with Tensorflow Object Detection API
Few days ago I found this tensorflow medium blog post saying that it was possible to create your own “realtime mobile object detector in 30 minutes”.
I was aware of Transfer Learning technique (i.e. using a model already trained on one task and re-purposing it on another yet related task). This allows us to train a “cat vs. dog” image classifier reaching near 90% accuracy in less than 25 lines of code for example.
I was more skeptical about the time they say it would take to build this detector. So I have decided to give a try by myself to see how “easy” it is in 2020 to build a custom object detector, train it and use it.
Gentle reminder about what is an object detector
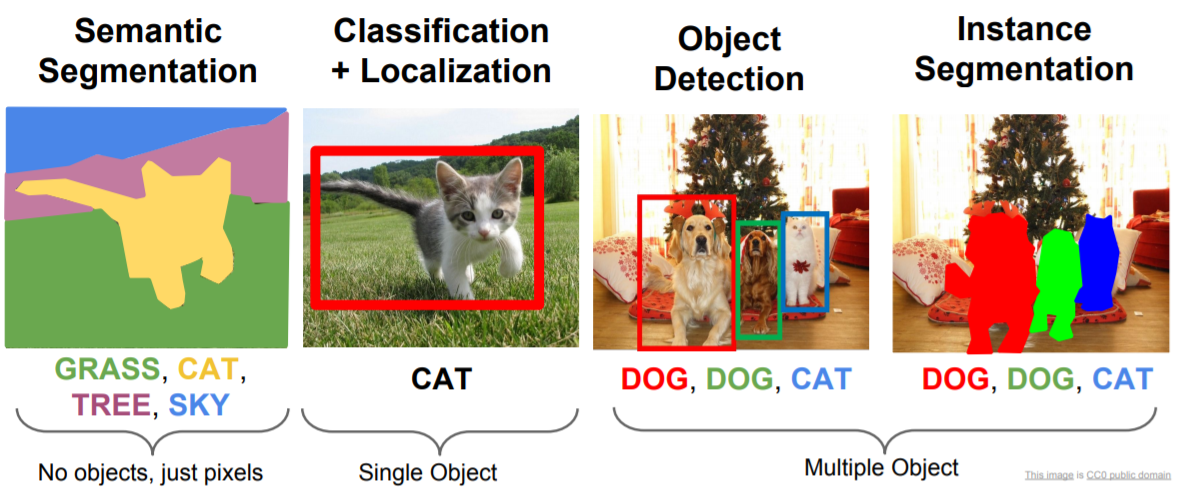
Where does Object Detection land in the Computer Vision area?
Computer Vision world is wide and there is a lot to say but that would be far beyond the scope of this post so here are only few examples:
- The well known image classification: is it a dog or a cat? With its multiclass equivalent: to which breed this dog belongs to?
- Object detection: where are the objects within the picture?
- Semantic segmentation/Instance segmentation: put some pixel masks on elements
- …
And many others that are not shown below: activity recognition, pose estimation (a.k.a body parts detection: nose, ears, eyes, elbow and so on), facial recognition, emotion detection to name but a few.
Different approaches
So far in Object Detection, there are 3 main approaches:
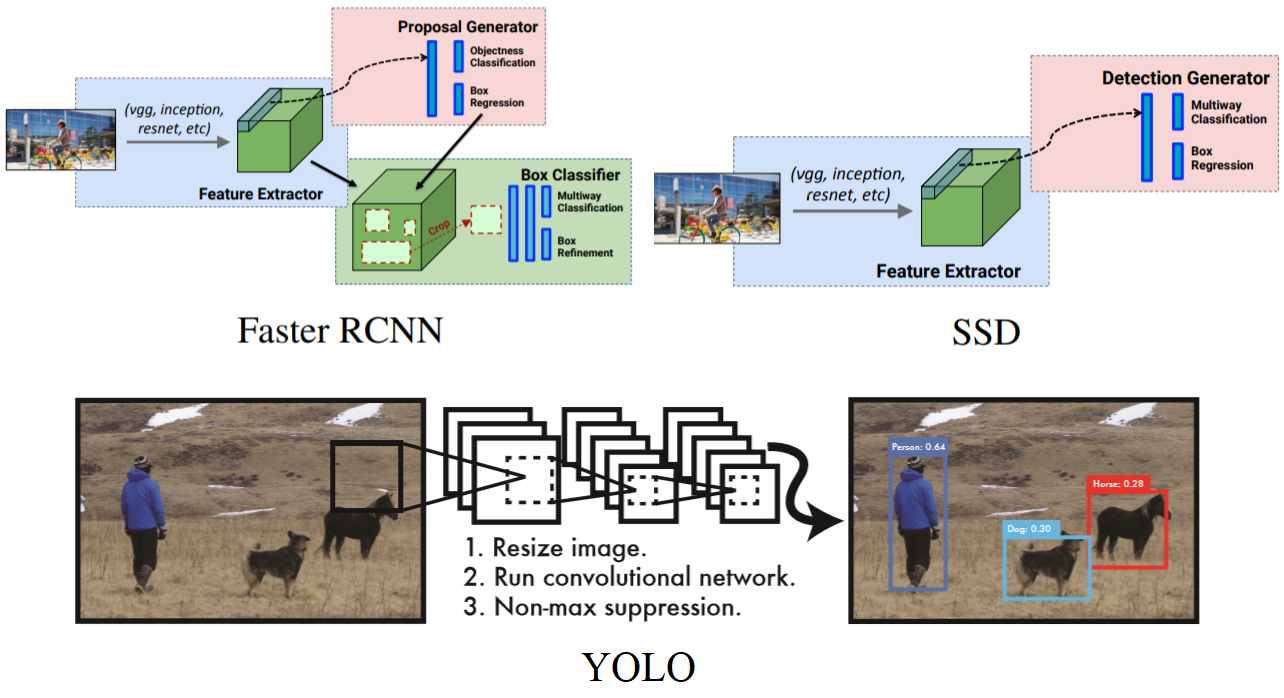
Main difference is that Single Shot Detectors (SSDs) and YOLO use a one-stage detector strategy whereas the R-CNN ones have two stages (some regions of interest are first proposed and then, for each one, there is an image classification step through a CNN).
Inference on the former is then much quicker but accuracy is often higher with the latter.
In the end it is a trade-off between speed and accuracy, it depends on the business needs.
YOLO has its own architecture whereas SSD are models built upon a backbone network that you can choose: VGG, MobileNet, etc. It leaves us with a lot of possibilities and one has to choose wisely depending on the objective.
There will not be more details because a lot of other people have already explained those models better than me and I have nothing more to add.
For the rest of this post you do not need to understand precisely how it works under the hood, I just wanted to introduce those strange names because they will come back later.
For a deeper presentation of object detection models, I have shared some links in the resources section12345.
Performance evaluation
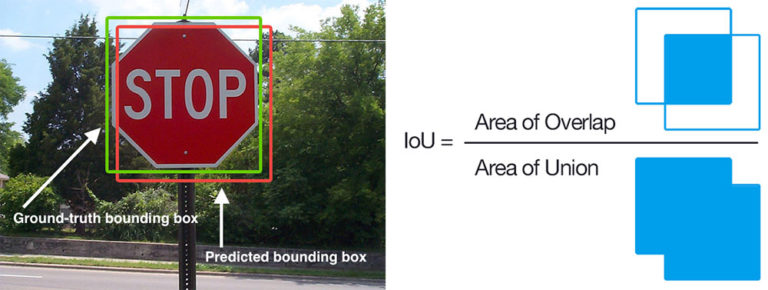
To measure model’s performance, we use an evaluation metric called mean Average Precision (mAP) which is based on the Intersection over Union (IoU) across all classes in our dataset. Keep this metric name in mind, it will come back later.
Current state of the art (SOTA)
Object Detection is constantly improving. Let’s see, at the time writing, the state-of-the-art results:
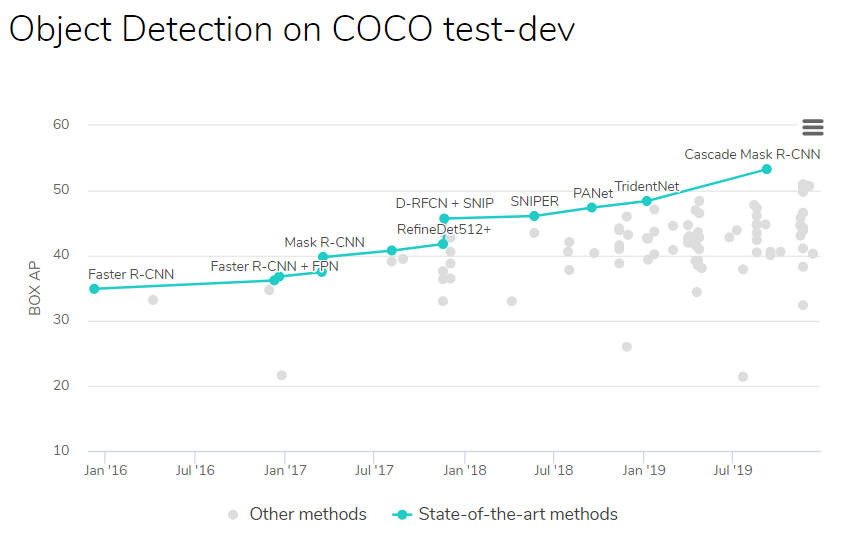
As you can see this is not a real new topic and there were big improvements over past years (+18% precision over last 3 years). There are still regular improvements because a lot of teams in labs, universities, GAFAM are trying to beat the SOTA results. See also how there are more and more referenced initiatives with time going.
Few comments for a better understanding:
- COCO: it is one of the image datasets available on Internet. It stands for Common Objects in COntext and is very often used as a benchmark so that we can compare models between them by measuring their mAP on this dataset.
- Detectors trained on COCO dataset are able to detect objects belonging to 80 classes whereas it is only 20 classes for PASCAL VOC dataset
- Some models are better at detecting one particular class, here the result is an overall one, meaning that it averages all classes results
- Best models are almost all R-CNN ones. Like I said, they are the most accurate but also the slowest ones
Off-the-shelf and ready-to-use models
Fortunately for us, in 2020, there are a lot of pretrained and available models that we can use freely. It means that not only researchers have publicly published the architecture and sometimes
the code but they have also shared the files corresponding to the trained detectors.
If the thing/object we want to detect belongs to a class the model has been trained on, there is almost nothing to do apart from downloading the model and wrapping it into our app.
If you are a little bit skilled in software engineering, this is not a big deal.
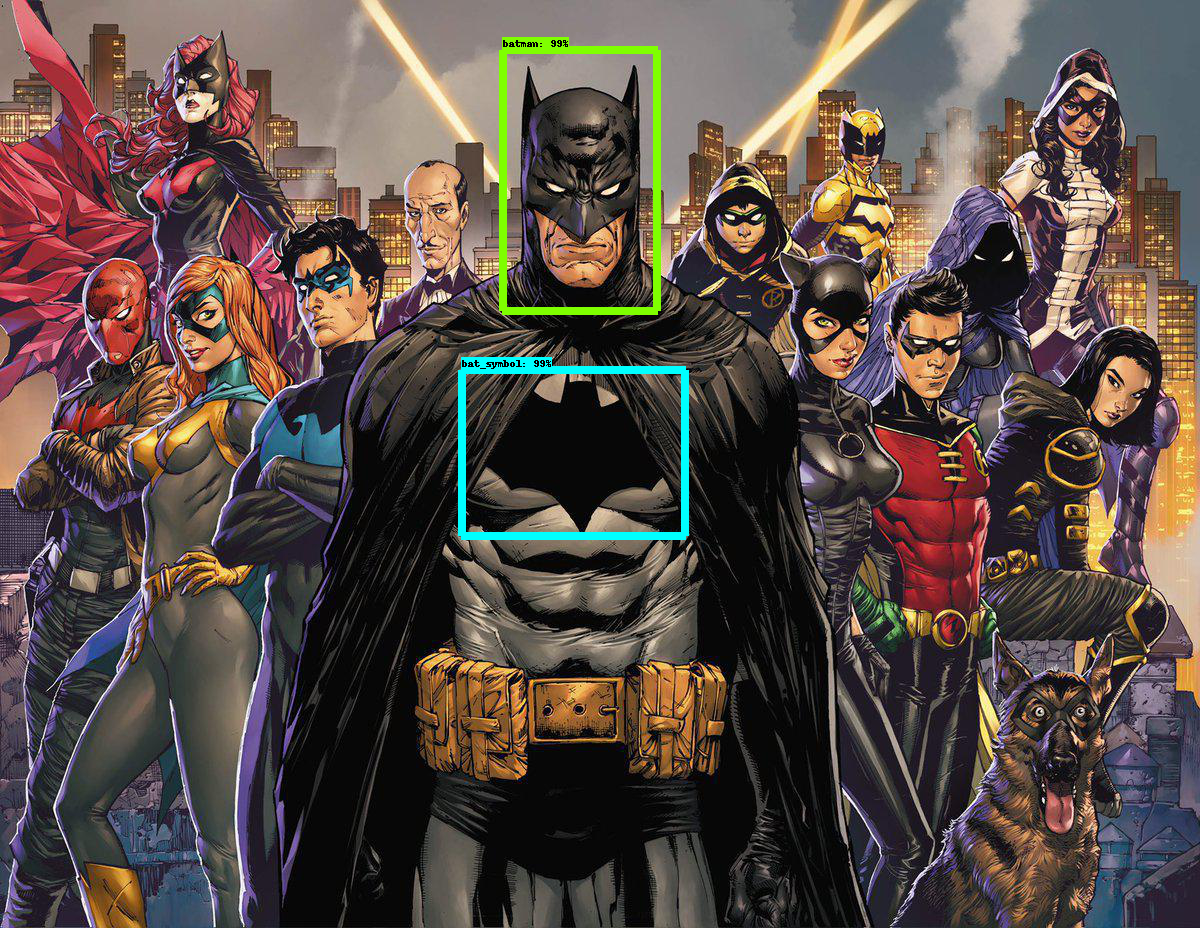
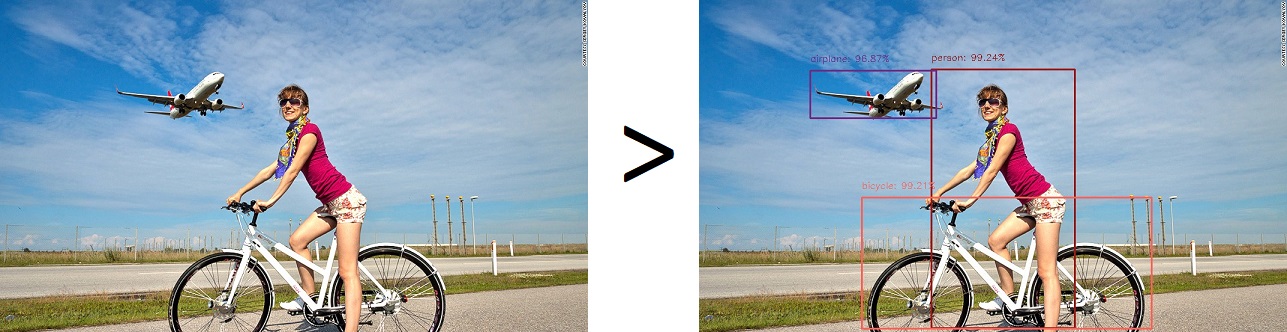
Here is for example result I got with a pretrained model on this picture:
But what if we want to build a brand new detector for a specific use case? (and that is the original purpose of this post)
A practical bat-case
Let’s imagine we want to detect objects that are not part of the available 80 classes from COCO. As a Batman fan, this choice was pretty obvious to me.
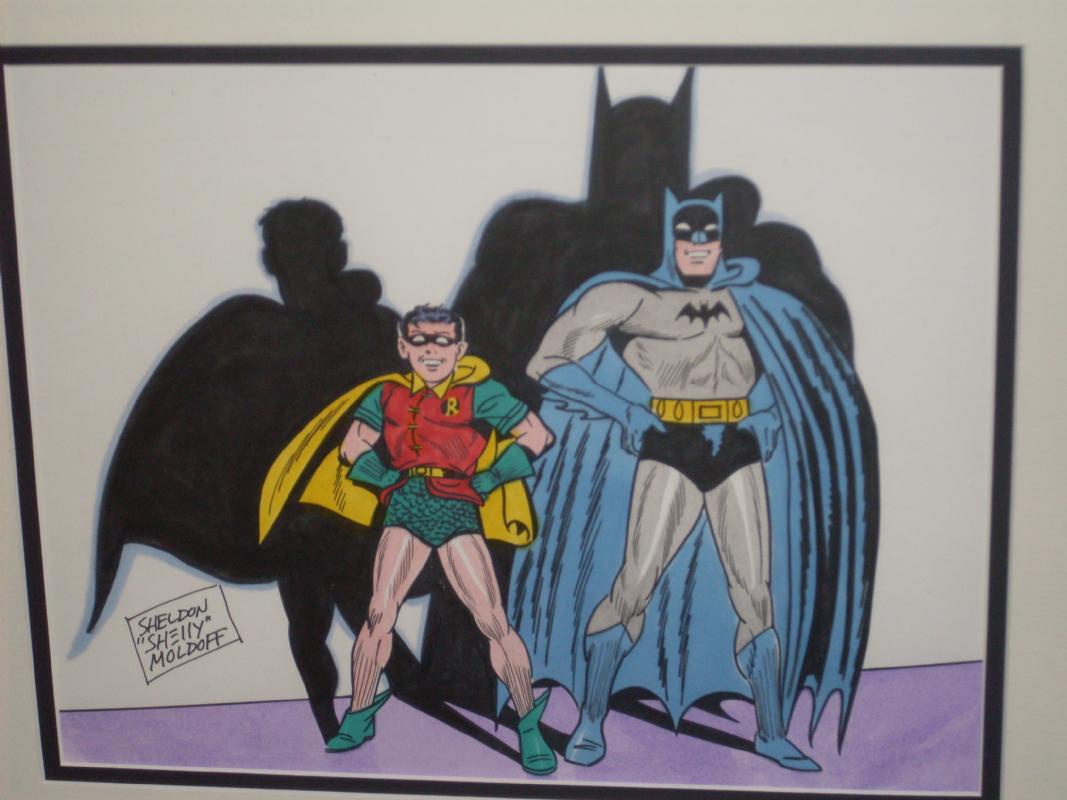
Trying to detect Batman in pictures might be a little bit challenging because he is an old guy (he is now more than 80 after all) and over time, he has been drawn by many different artists and sometimes there are real differences from one Batman to another.
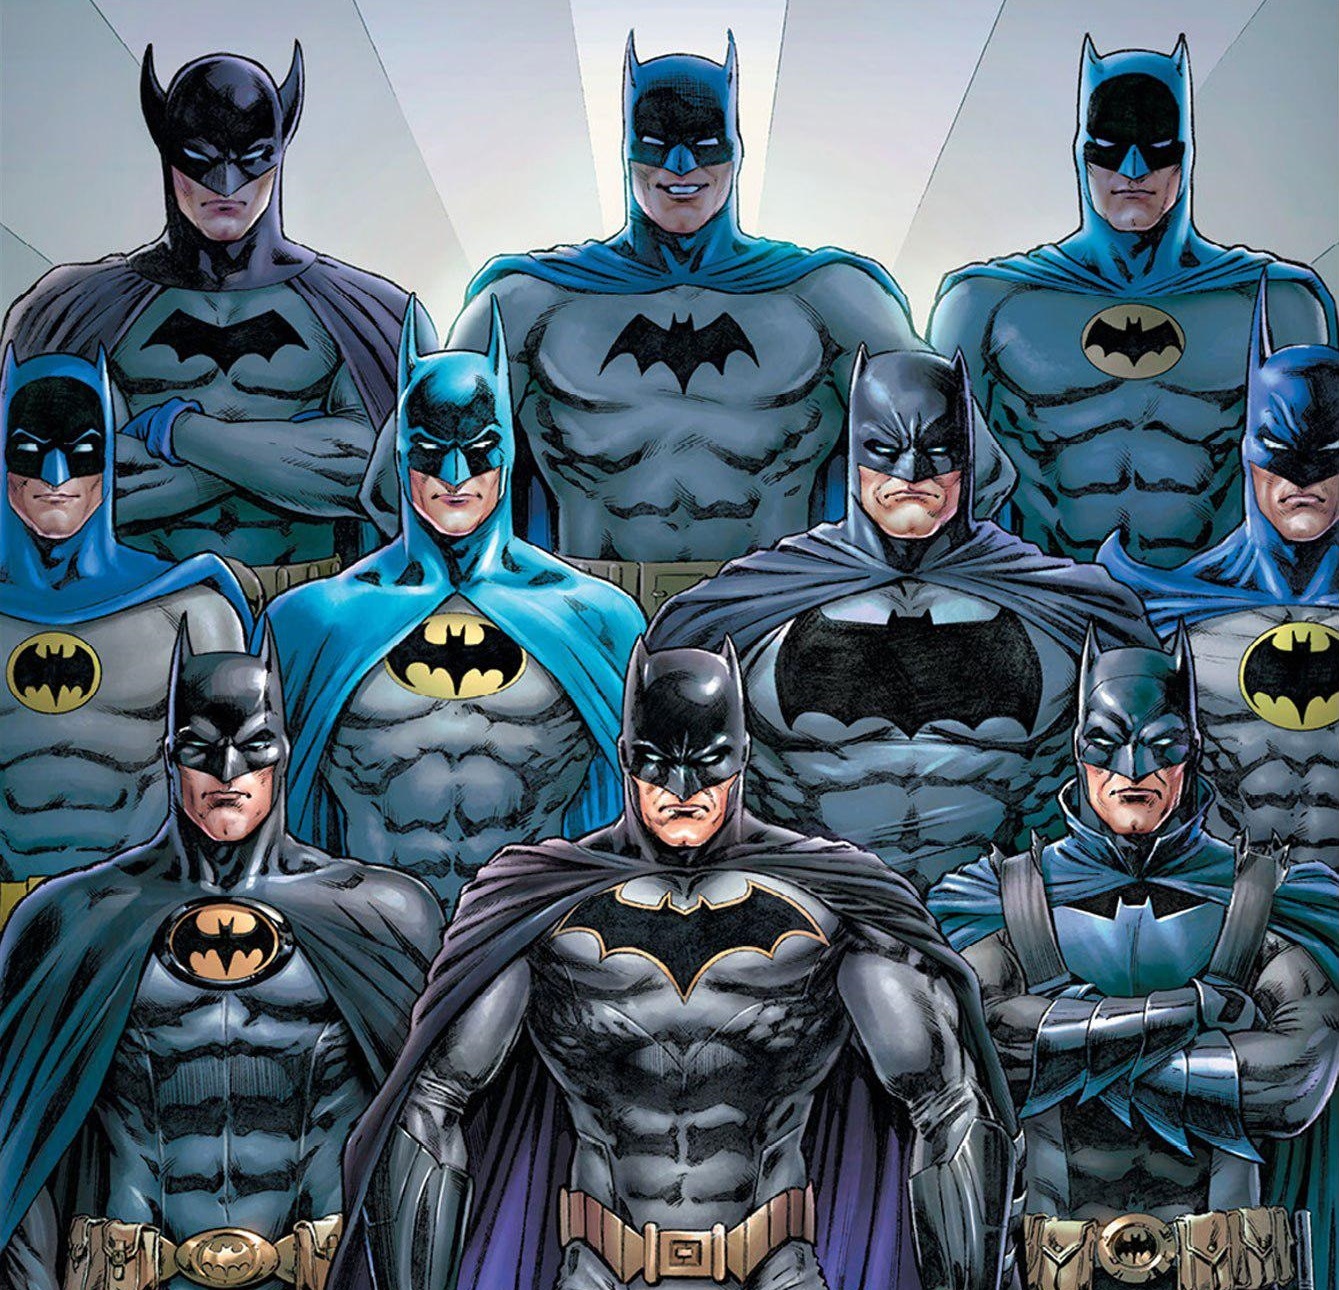
If you show the previous picture to a 4 years old kid he will tell you that all are Batman, no doubt.
But let’s remind this:
So, will the machine be able to detect Batman characteristics while being able to generalize to the most Batman pictures ?
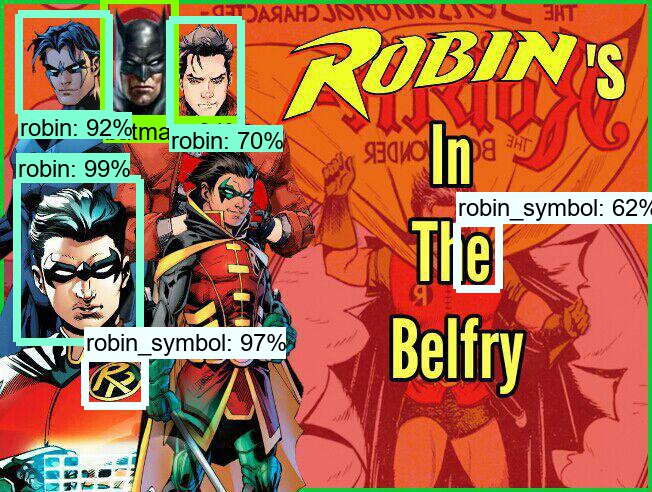
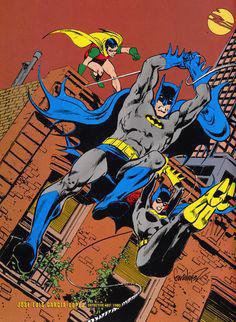
The question is even more relevant for Robin as there were 5 different Robin over time and for this character who even once was a girl for a while, the transformation is much more visible.
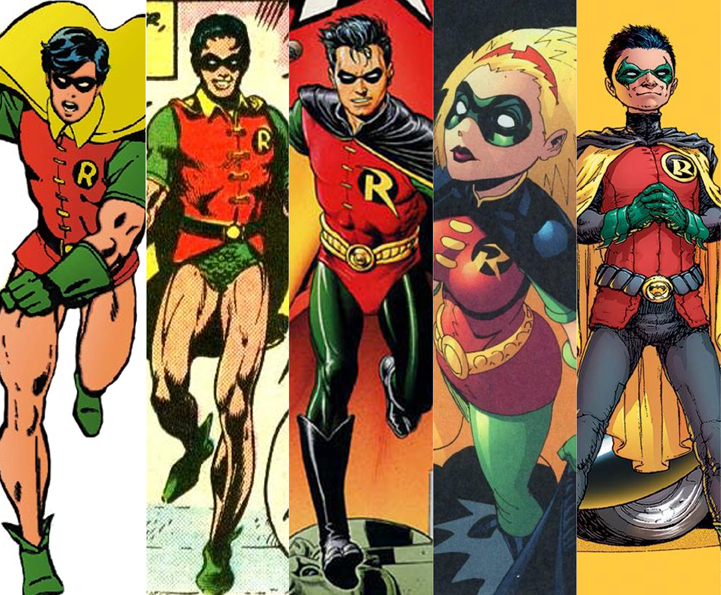
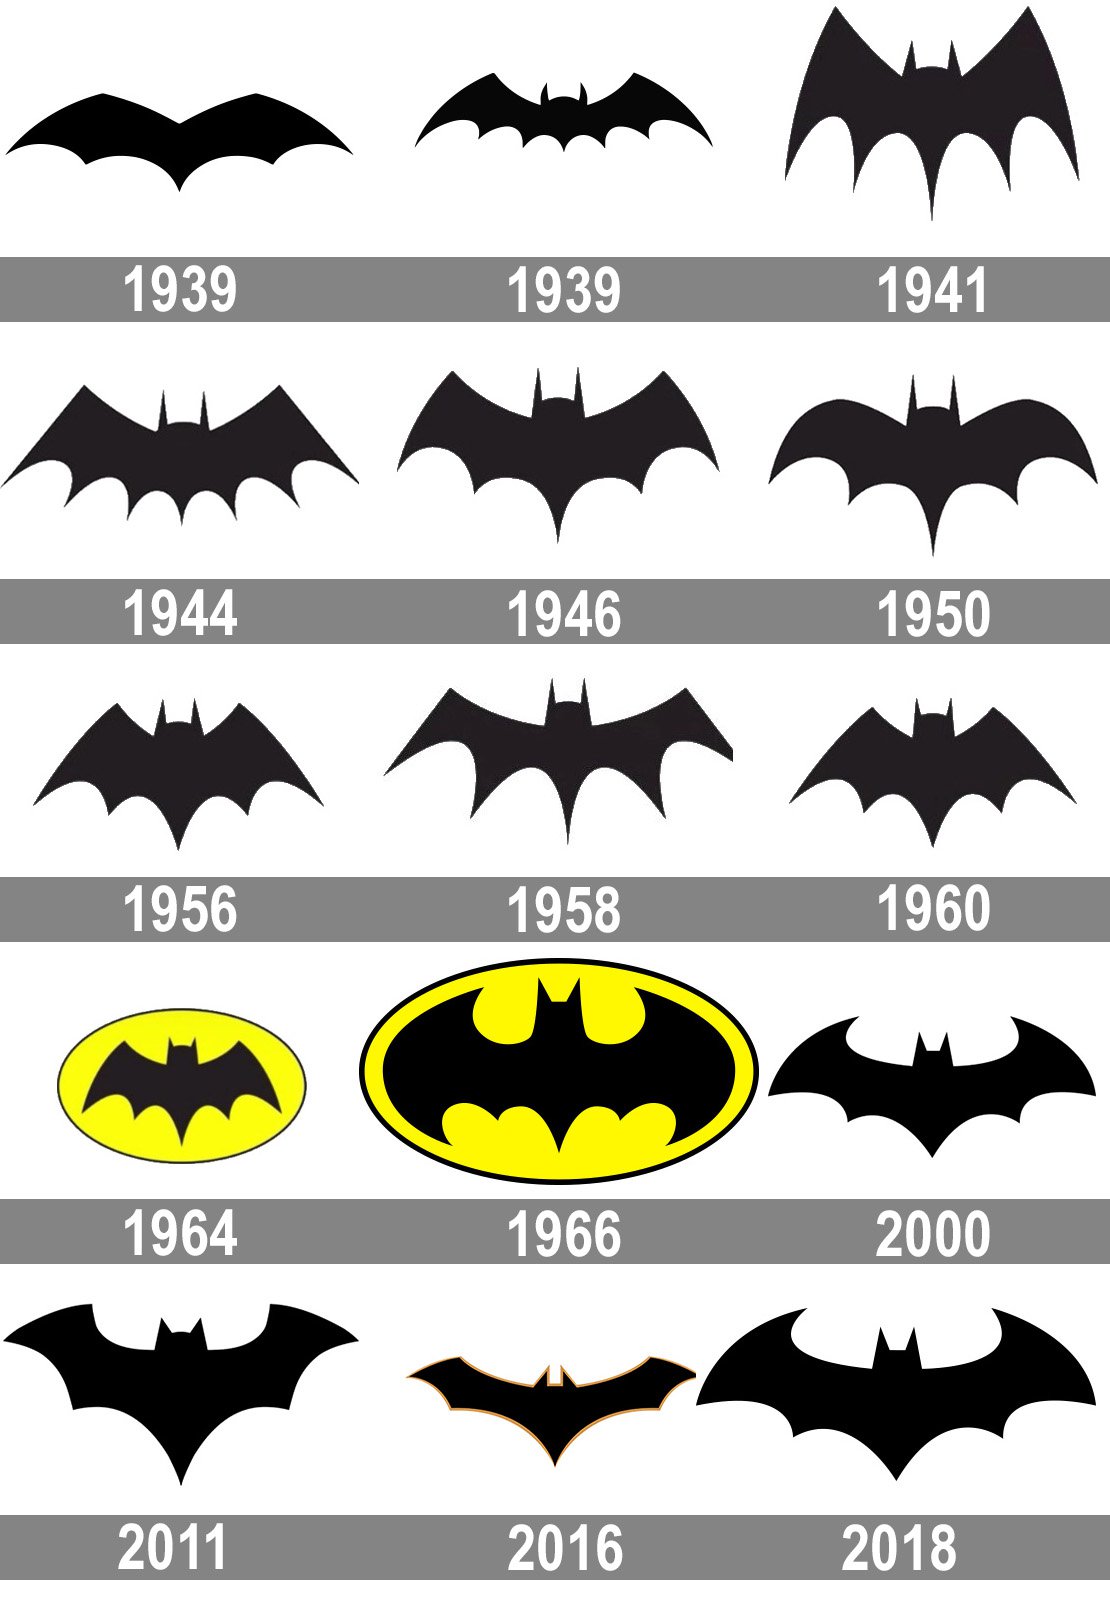
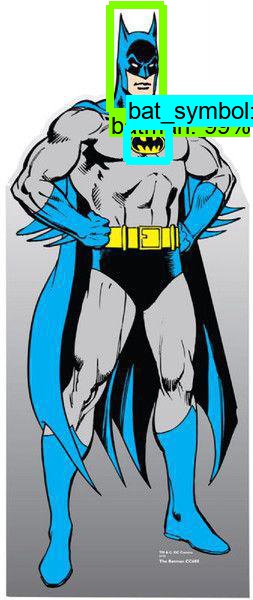
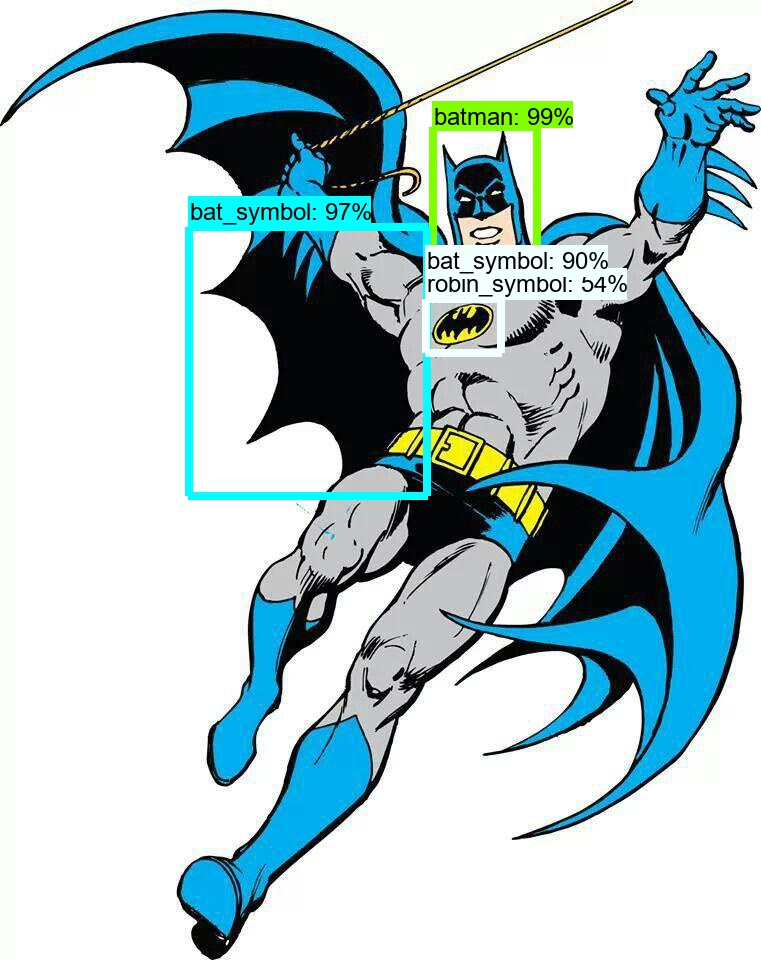
The Bat symbol is also very different over years, can we catch it?
And what would be Batman without his nemesis: Joker? Let’s add this character also.
So in the end, I will try to build a model able to detect 5 elements (classes):
- Batman's face
- The Bat symbol
- Robin's face
- The Robin symbol
- Joker's face
Applying Transfer Learning
In 2020, there is no reason to train such a model from scratch, that would take ages to run and would need a lot of data. There are brilliant people in GAFAM labs, universities and so on that are working hard every day to increase precision and beat SOTA. Let’s them taking care of this part of the job.
We can instead use their trained models and specialize them on a similar task. This works very well for images because models have been trained to recognize so many things and, at some point, there is no such difference in recognizing shapes and curves in an image with a cat than in an image with Batman: they are all curves, more or less.
The big idea behind Transfer Learning is to reuse the first layers of the neural network because they have been trained to detect very basic things such as edges, curves, certain shapes. The only thing we have to do is to fine tune (i.e specialize with new training) the last layers of this network so that the output will match the number of classes we want to detect (5 in our case).
Where do we start from?
The tensorflow medium blog post is a good starting point. I highly recommend this very good step-by-step tutorial and I would also suggest to give a look at the notebook from the official documentation.
Steps to go
Here are the main steps we will have to go through:
- Build the training and testing datasets that will be used to train our model. In other words it means: collect a lot of pictures/videos of Batman, Robin and Joker.
- Put labels and ground truth bounding boxes on those images
- Choose wisely the pretrained model within the model zoo
- Train the model
- Test it
Step 1: data collection
Here you can use whatever technique you want. I mainly took from Google images and from my personal comic books. The task is tedious but easy: collect as many different pictures
as possible. The more you get the better.
Pay attention to grab enough pictures for each class (recommendation is at least 200 per class, not always doable though) so that the model does not learn always the same thing and we
have enough samples to show for each class.
Step 2: put truth labels and bounding boxes
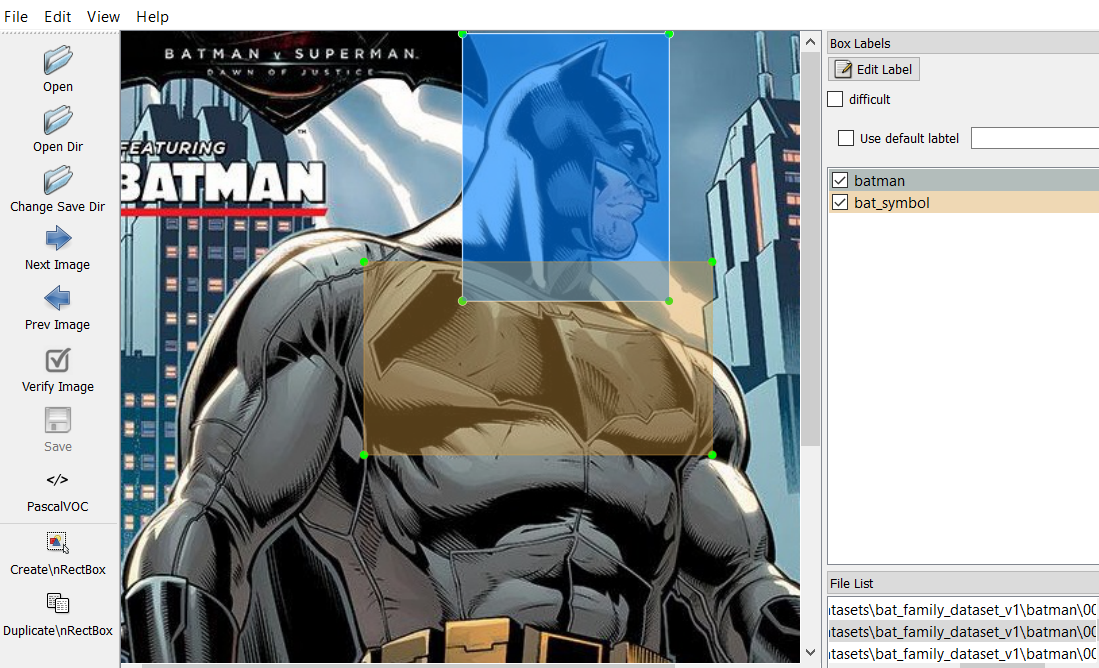
Another task which is not really funny but it has to be done one way or another: draw the real bounding boxes on images. To do that, I have used this LabelImg tool and it works very well.
This tool generates annotation files with boxes coordinates (saved as XML files in PASCAL VOC format).
Note that this tool can also generate files for YOLO models.
Step 3: choose the trained model that we will fine tune
Visit the Tensorflow Object Detection model zoo and choose one that suits your needs.
If real time is more important than accuracy then go for SSD, otherwise you may consider using R-CNN.
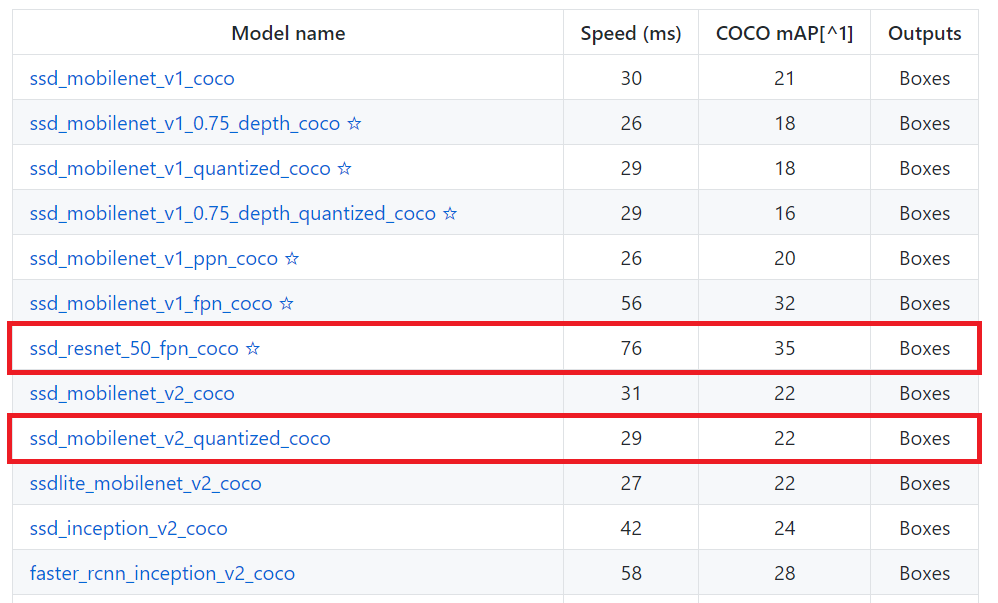
As I would like to deploy the model on my phone, I will go with SSD with a MobileNet backbone because MobileNet are lighter yet efficient models specially made for on-device inference.
I will also give a try to a SSD with a Resnet backbone as it is a good trade-off with higher accuracy and still affordable latency.
Step 4: training time!
Before launching the training there are 2 left things to do:
- As explained in the Tensorflow Object Detection API official documentation, expected input is for data is .tfrecord. We then have to convert our XML files to match the expected format. Fortunately, in the step-by-step guide, the author has already done the job and is gracefully sharing his code6.
- We have to configure the
pipeline.configfile corresponding to our chosen model in order to specify some values:- how many classes we have to detect?
- where are train and validation datasets?
- how many learning steps?
Once this is done we can launch the training. Here you have several options:
- train on your own computer if you have GPU
- train on the cloud where you want (GCP, AWS, whatever)
- use Google Colab which offers you free GPU. Yes: free.
I went with the third option. What is really cool with Colab (apart the fact that it works fine and is free) is that you can connect your Google Drive to the environment. So basically for the training session, here is what I did:
- Upload my datasets (.tfrecord files), my modified pipeline.config file and another file that transforms classnames into integers somewhere on my Google Drive
- Open a new Colab environment
- Clone tensorflow models github repository, install dependencies, compile then install the API (all steps are explained in official documentation here)
- Connect my GDrive to this environment to get access to uploaded files
- Launch the training
- Save and export trained model into Tensorflow SavedModel format
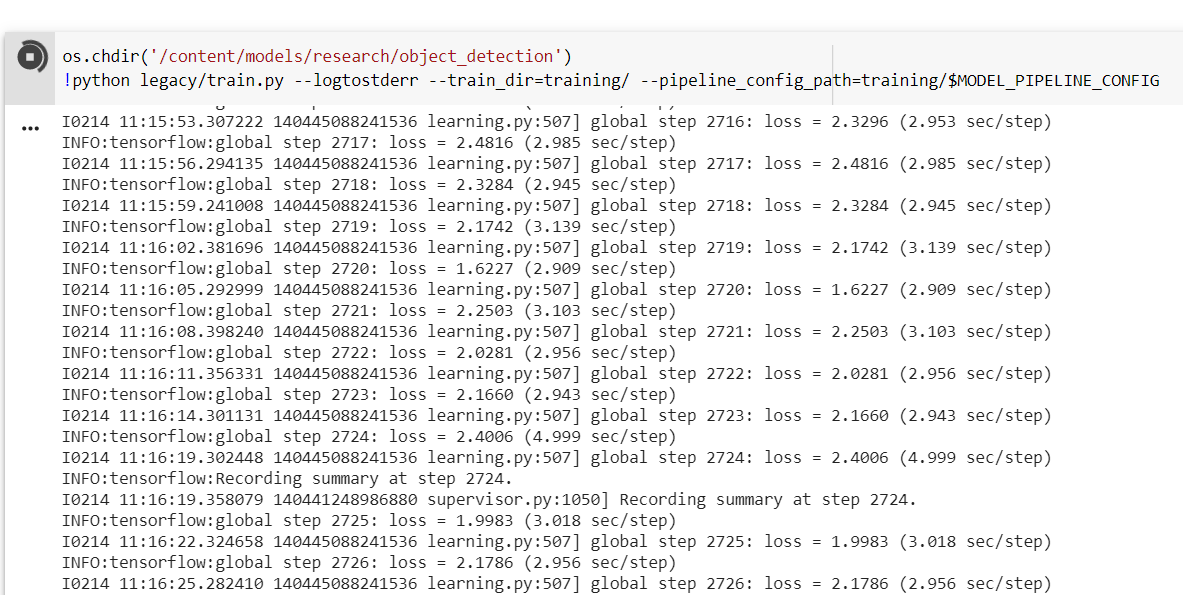
I trained for 2000 steps for the Resnet (~4.5 hours) and 3500 steps for the MobileNet (~4 hours). Training dataset contains around 400 images and validation one around 80.
For this training task, I have used the train.py script that is already provided within tensorflow/models/research/object_detection/legacy folder. This executable is used to train
DetectionModels. There are two ways of configuring the training job. I have used the one with the single pipeline_pb2.TrainEvalPipelineConfig configuration file that
can be specified as command argument --pipeline_config_path:
Example usage:
    ./train \
        --logtostderr \
        --train_dir=path/to/train_dir \
        --pipeline_config_path=pipeline_config.pbtxt
Once the model has been trained for the number of steps specified or once you are satisfied with the loss metric, it is possible to export the training into a frozen graph, again with an
already provided tool. To run it, all we have to do is to give in our chosen checkpoint and our pipeline config and wherever we want the inference graph to be stored.
For example:
python3 export_inference_graph.py \
    --input_type image_tensor \
    --pipeline_config_path training/YOUR_CONFIG_FILE.config \
    --trained_checkpoint_prefix training/YOUR_CHECKPOINT \
    --output_directory YOUR_OUTPUT_DIR
Step 5: test the model
This is where I had more troubles because Google researchers have published this API and examples with the 1.12 version of Tensorflow.
At the time writing Tensorflow 2.1 has been released and it is the 1.15 version by default within Colab environments.
There were some breaking changes in the API or in the core package, some elements were deprecated and I had to make some adaptations in the official example code to make it work with new functions signatures for example.
Nothing really hard when you have developer background but still one more step to deal with.
As the model has been saved in Tensorflow SavedModel format, it is easy to wrap it into a class that will load it, keep a reference on the Session and expose a predict method:
class MyOwnDetectionModel(object):
  def __init__(self, path_to_model_dir):
    self._session = tf.Session()

    model_dir = pathlib.Path(path_to_model_dir)/"saved_model"

    start = time.time()
    model = tf.saved_model.loader.load(self._session, [tf.saved_model.tag_constants.SERVING], str(model_dir))
    end = time.time()
    print("Loading the model took {:.5} seconds".format(end - start))

    self._model = model.signature_def['serving_default']

    # Here we have to transform all TensorInfo from model.outputs into tf.Tensor
    # It could be good to automagically transform inputs/outpus information which are of type ParsedTensorInfo into TensorInfo
    # but so far I have not found an easy way to do that so for the moment it is hardcoded
    # See https://www.tensorflow.org/api_docs/python/tf/compat/v1/Session#run
    fetches = {}
    t_names = ['detection_multiclass_scores', 'detection_classes', 'num_detections', 'detection_boxes', 'raw_detection_boxes', 'detection_scores', 'raw_detection_scores']
    for tensor_name in t_names:
      # Pay attention to the ':0' that is added to tensor key name, this string is added to each tensor name in signature definitions
      fetches[tensor_name] = self._session.graph.get_tensor_by_name(tensor_name + ':0')

    self._fetches = fetches

  def predict(self, image):
    """
    :param image: (ndarray) the image as an array of shape [1, width, height, 3]
    """
    start = time.time()
    output_dict = self._session.run(self._fetches, feed_dict={'image_tensor:0': image})
    end = time.time()
    print("Inference for this image took {:.5} seconds".format(end - start))
    return output_dict
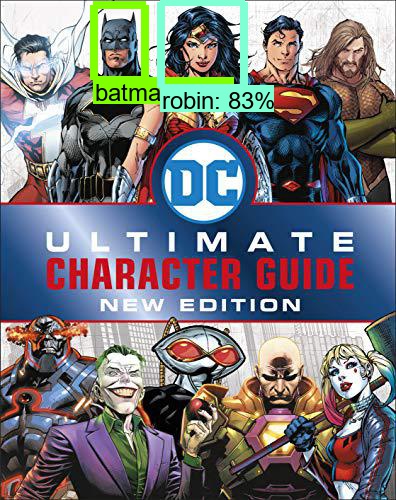
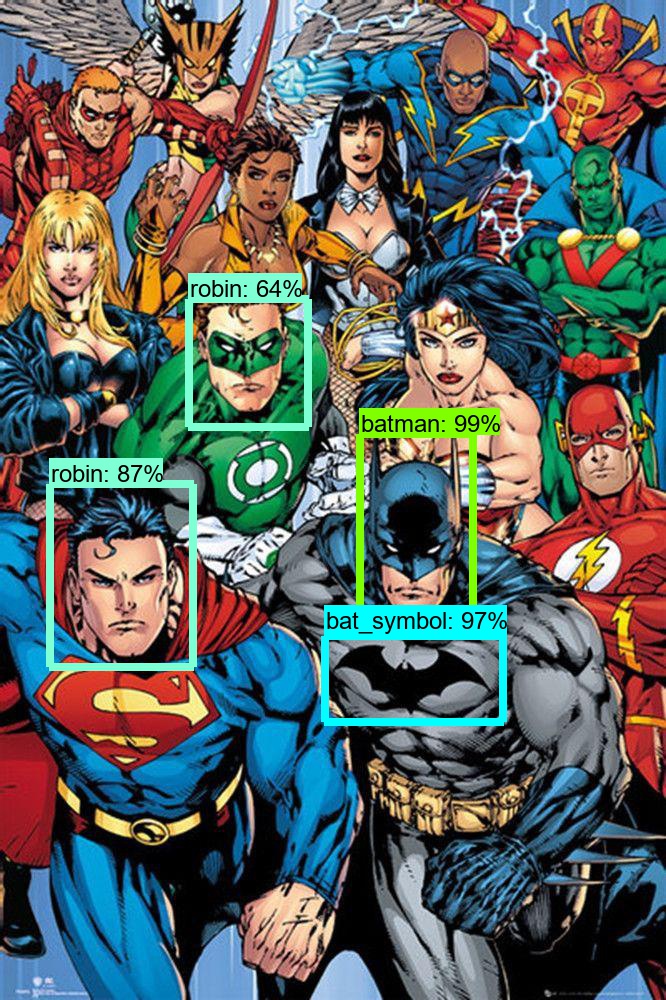
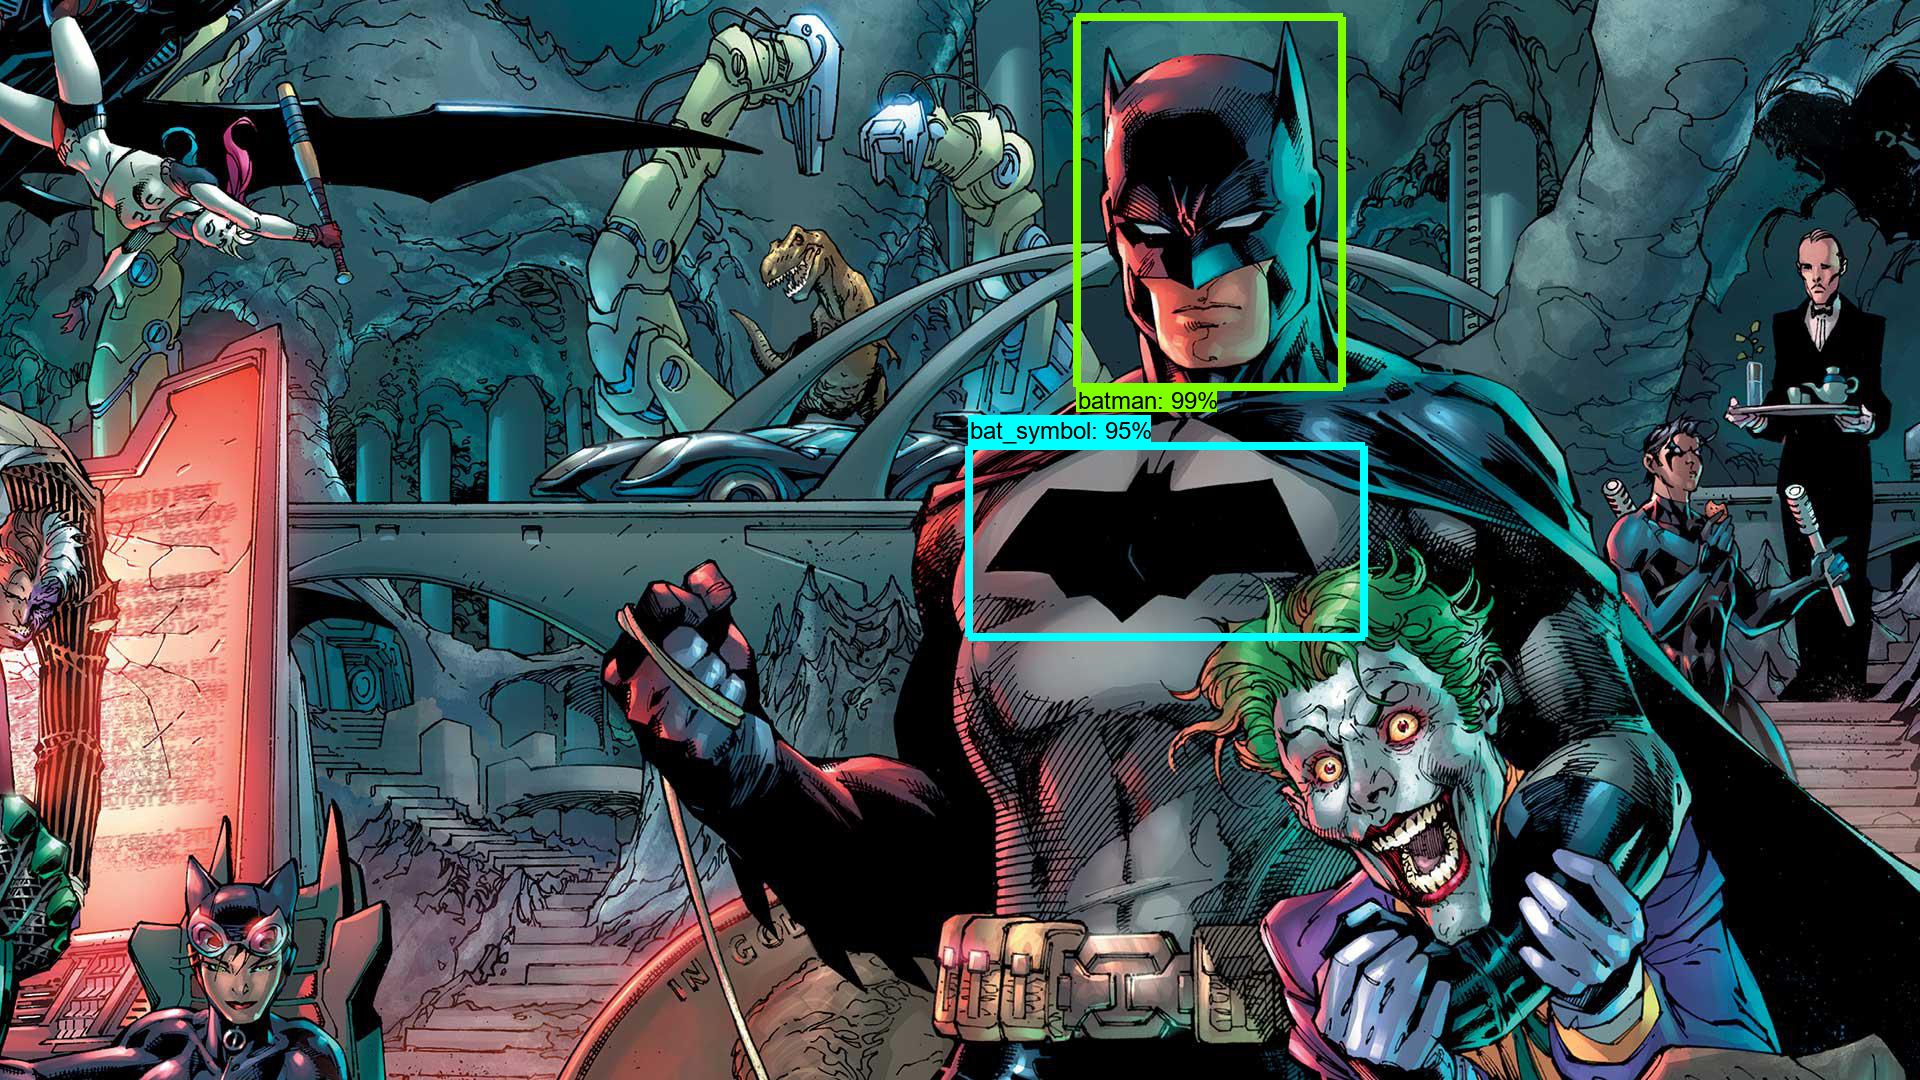
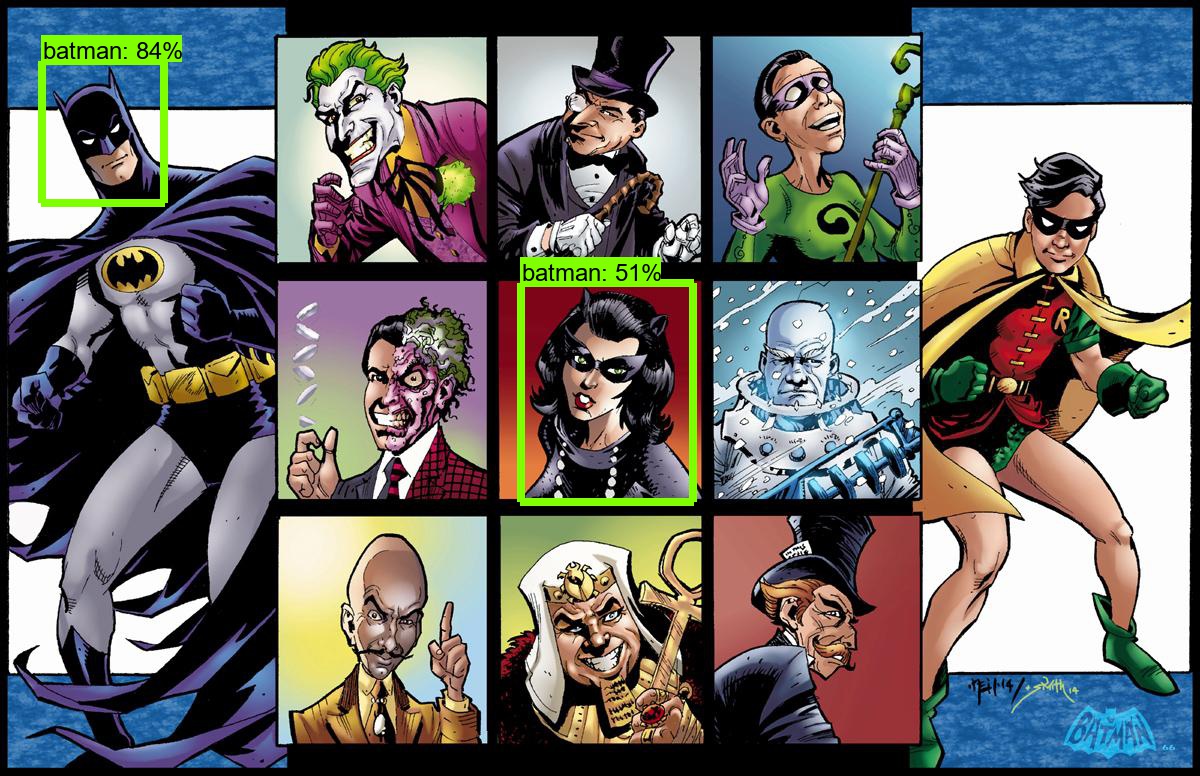
Final results
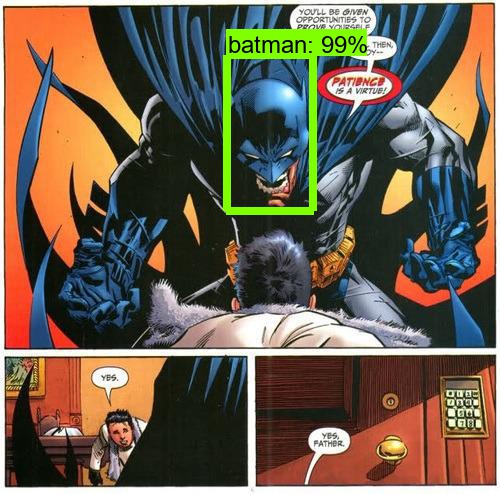
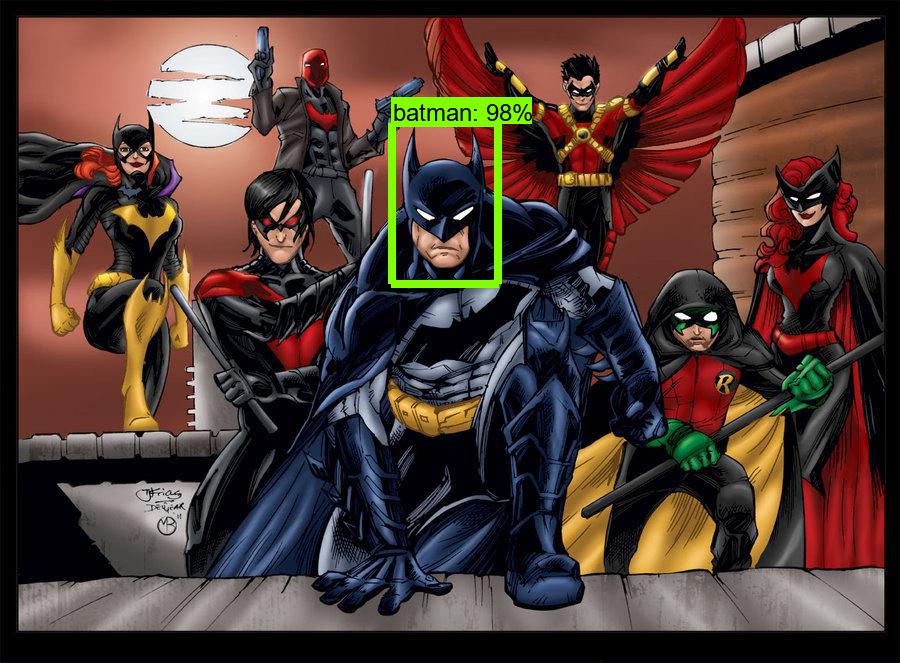
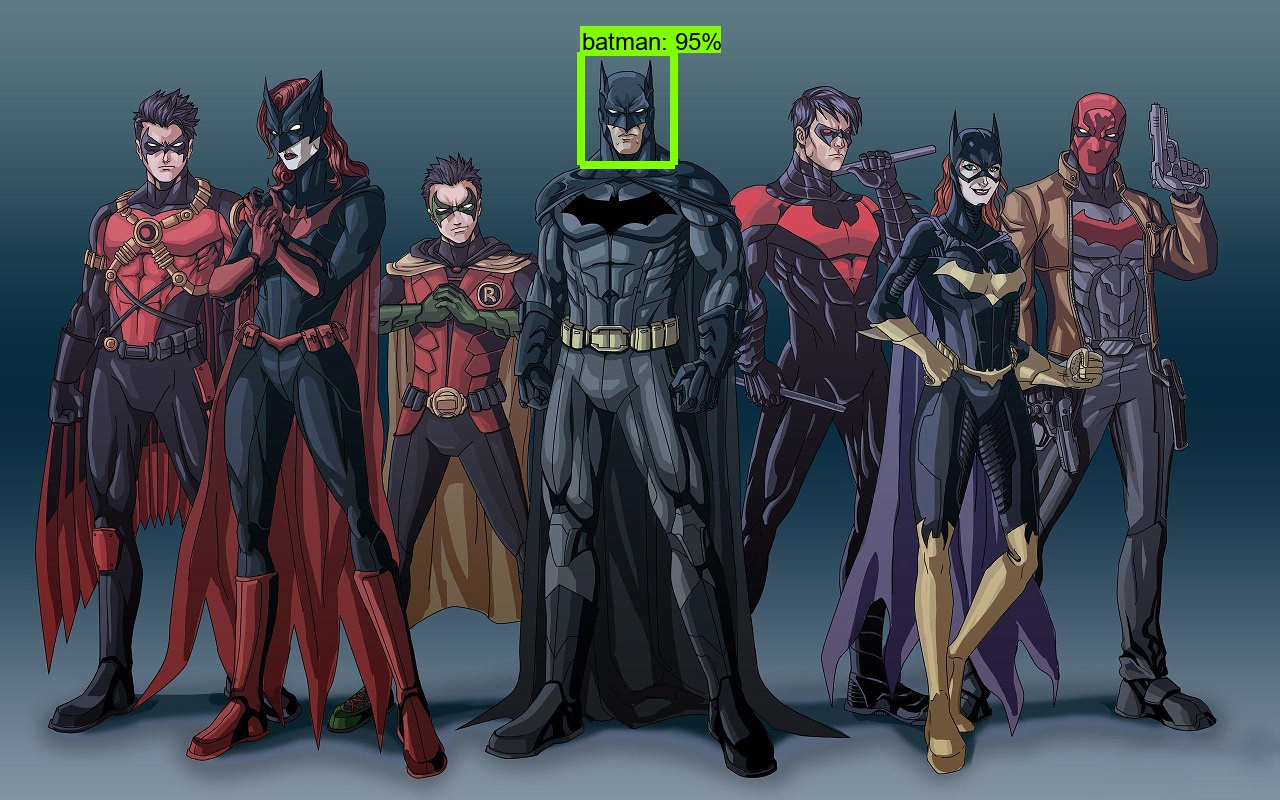
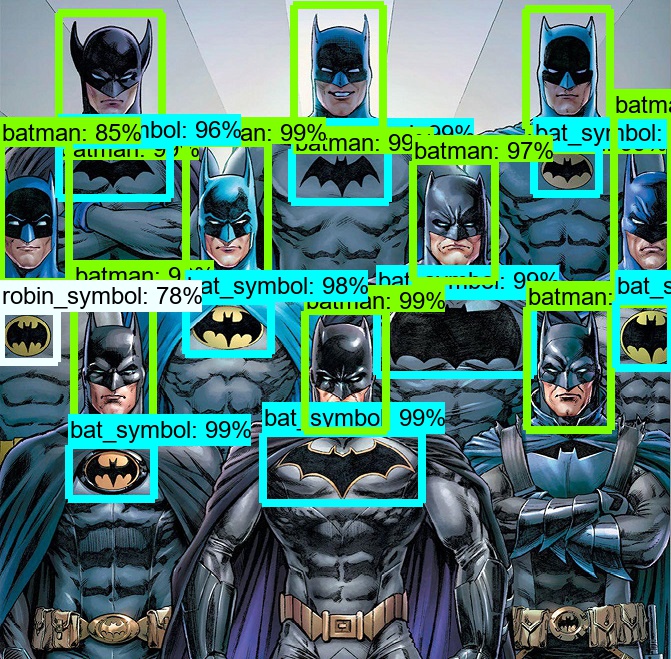
Below is a gallery of pictures that went through the SSD Resnet50 detector model (click on image to zoom in):

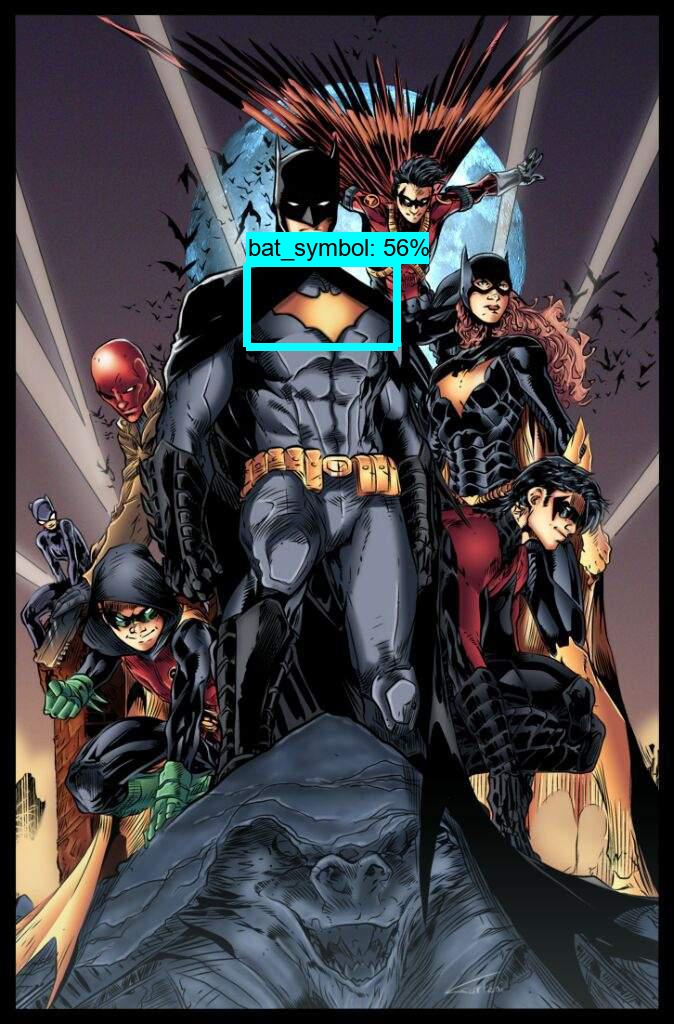
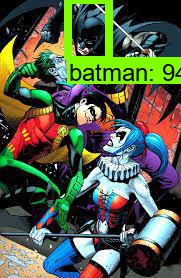
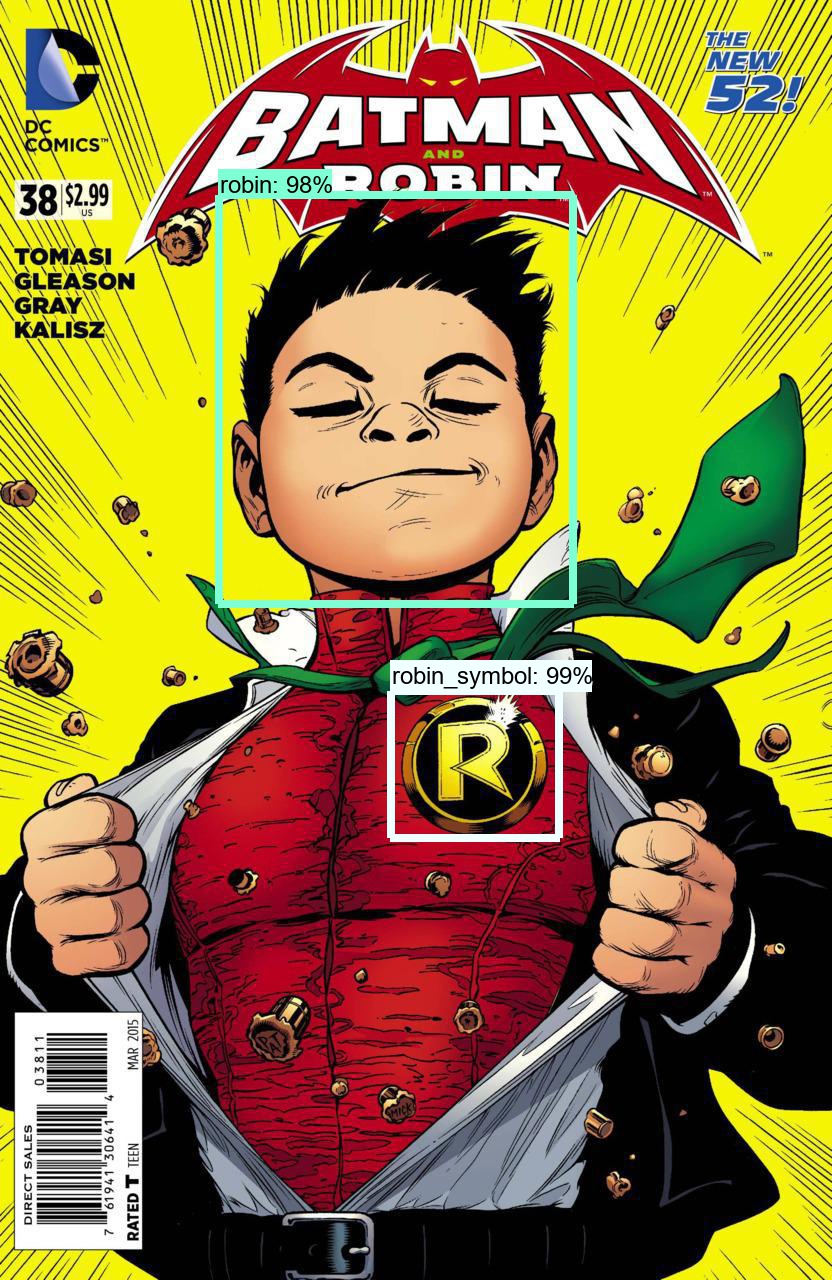

Few comments regarding those results:
- MobileNet was not able to reach this precision and missed most of the Batman pictures.
- Robin was often missed, probably because I had less Robin pictures and most of them were Damian Wayne or Tim Drake. It is interesting to note that Stephanie Brown was not detected as Robin (in 3rd picture) because the model has never seen her!
- Joker was, sadly, almost never found. I had even less pictures of Joker to show to the model, that is not a big surprise to me
Those results below are not bad but they could have been better (Robin or Joker detection for example). Results are sometimes funny also: see how other characters are classified as Robin, for example Green Lantern with his mask. See also how Batman howl is mistaken with the Bat symbol:
Finally, no AI being perfect, here are some pictures in which the model was not able to detect something:

BONUS: realtime Batman Detector mobile app
Transform into TFLite format
To be able to use the model on the phone within an app, there is one step more to do: convert the graph into TFLite format. There are a lot of examples that does that by running TOCO converter with the Bazel compiler tool. I did not want to go into this kind of stuff so I made it with 2 steps:
- Build a TensorFlow frozen graph with compatible ops that we can use with TensorFlow Lite:
python3 export_tflite_ssd_graph.py \
    --pipeline_config_path training/YOUR_CONFIG_FILE.config \
    --trained_checkpoint_prefix training/YOUR_CHECKPOINT \
    --output_directory YOUR_OUTPUT_DIR \
	--add_postprocessing_op=true
- And then use the TFLiteConverter provided within Tensorflow:
# To avoid installing and using Bazel and TOCO...
# Those names are given here: https://medium.com/tensorflow/training-and-serving-a-realtime-mobile-object-detector-in-30-minutes-with-cloud-tpus-b78971cf1193
input_arrays = ["normalized_input_image_tensor"]
output_arrays = ['TFLite_Detection_PostProcess', 'TFLite_Detection_PostProcess:1', 'TFLite_Detection_PostProcess:2', 'TFLite_Detection_PostProcess:3']

converter = TFLiteConverter.from_frozen_graph(graph_def_file, input_arrays, output_arrays, input_shapes={"normalized_input_image_tensor": [1, 300, 300, 3]})
converter.inference_type = tensorflow.lite.constants.QUANTIZED_UINT8
converter.quantized_input_stats = {input_arrays[0] : (128, 128)}  # mean, std_dev
converter.allow_custom_ops = True
tflite_model = converter.convert()
open(saved_tflite_model_name, "wb").write(tflite_model)
Use it within the app
Once converted into Tensorflow Lite format optimized to run low-latency, I made small changes to the Tensorflow Object Detection Android demo,
mainly to use my model and to build a darker theme.
Here is a video of the app running on my phone and tried on several stuff at home: my son’s toy, a big DC Comics picture and even on one of my comic book.
If the video does not start for any reason, here is the link to download it (~10Mb).
WRAP-UP
We have discovered the main principles of Tensorflow Object Detection API and what are the steps to build and train a custom object detector.
Good surprise is that it is quite easy to build such a tool in a small amount of time. It took me much more time to collect and label all data than to actually train the model. In the
original blog post, they said 30 minutes but it was because the datasets were ready to use. If you want to build a performant detector you will have to be very patient.
This is not a surprise and a lot of DataScientists would tell you: data collection and data cleaning is almost 80% of the time you will spend on the job!
As usual, here are some possible further improvements:
- for sure, keep collecting pictures of Robin & Joker to reach the same level of precision than for Batman
- give a try to a R-CNN model, it could be able to detect them
Thanks for reading.
Author: nidragedd
Feel free to leave a (nice) comment if you want
Required fields are marked *